
前言
这段时间经常听到说用服务器安装哪吒探针检测自己的服务器,今天我也来试试搭建一个适用一下。今天还是用海外云服务器 VMRack 的机器。三网精品线路不管是平时还是晚上高峰期时网速都很稳定,最主要的是价格便宜。
安装 docker
不知道安装命令的可以到官网上去查找,一定要根据自己服务器的系统执行相应的命令。
默认使用 root 用户
export DOWNLOAD_URL="https://mirrors.tuna.tsinghua.edu.cn/docker-ce"
# 如您使用 curl
curl -fsSL https://raw.githubusercontent.com/docker/docker-install/master/install.sh | sh
# 如您使用 wget
wget -O- https://raw.githubusercontent.com/docker/docker-install/master/install.sh | sh
curl https://c.ysicing.net/oss/scripts/docker.sh | bash
初始化 docker
curl https://c.ysicing.net/oss/scripts/dockerconfig.sh | bash哪吒配置文件
创建目录
mkdir nezha
touch nezha/config.yaml
哪吒的配置文件 config.yaml, 示例如下
AvgPingCount: 2
Cover: 0
DDNS:
  AccessID: ""
  AccessSecret: ""
  Enable: false
  MaxRetries: 3
  Provider: webhook
  WebhookHeaders: ""
  WebhookMethod: POST
  WebhookRequestBody: ""
  WebhookURL: ""
Debug: false
EnableIPChangeNotification: false
EnablePlainIPInNotification: false
GRPCHost: agent.nzops.ysicing.net
GRPCPort: 5555
HTTPPort: 80
IPChangeNotificationTag: default
IgnoredIPNotification: ""
IgnoredIPNotificationServerIDs: {}
Language: zh-CN
Location: Asia/Shanghai
MaxTCPPingValue: 500
Oauth2:
  Admin: admin
  ClientID: 19507d56-xxxx
  ClientSecret: gto_xxxx
  Endpoint: https://gitea.local
  Type: gitea
ProxyGRPCPort: 0
Site:
  Brand: Monitor
  CookieName: ops-dashboard
  CustomCode: <script async src="https://umami.external.ysicing.net/script.js" data-website-id="c"></script>
  DashboardTheme: default
  Theme: default
  ViewPassword: ""
TLS: false
这里说下几个比较重要的地方
GRPCHost: agent 连接地址Oauth2配置的地方,我示例的是用 Gitea,由于某些因素,哪吒监控只支持 Oauth2 方式,常见使用 Github 方式
哪吒监控接入 Github、Gitlab、Gitee、Gitea 作为后台管理员账号,这里主要已常见的 Github 和我自用的 Gitea 为例。
Github 方式
登录 Github 后,打开 Oauth App
Application name - 随意填写。
Homepage URL - 填写面板的访问域名,如:"http://dashboard.example.com"(你的域名)。
Authorization callback URL - 填写回调地址,如:"http://dashboard.example.com/oauth2/callback"(不要忘记
/oauth2/callback)。
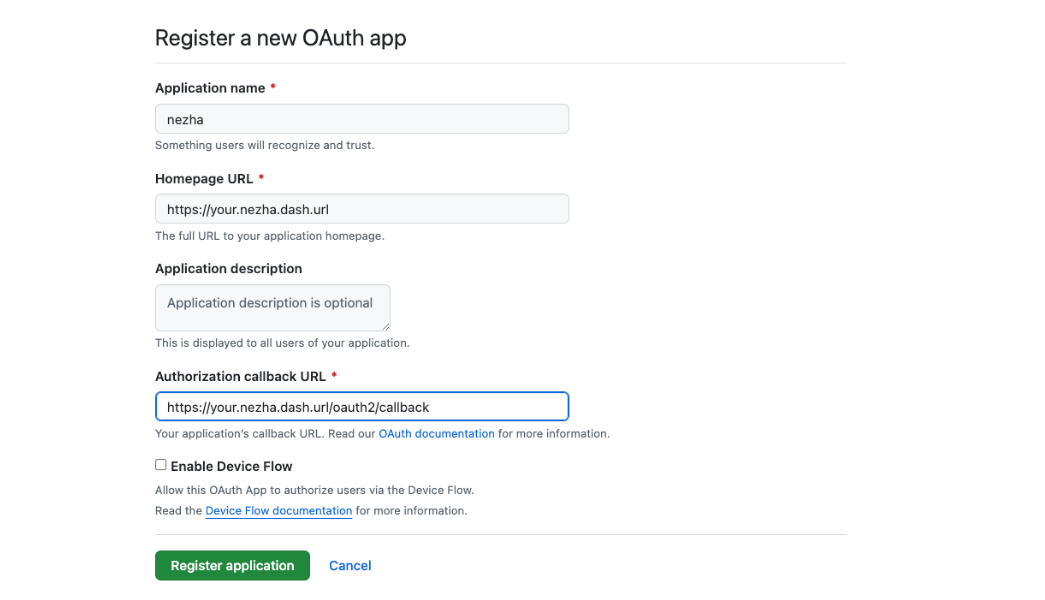
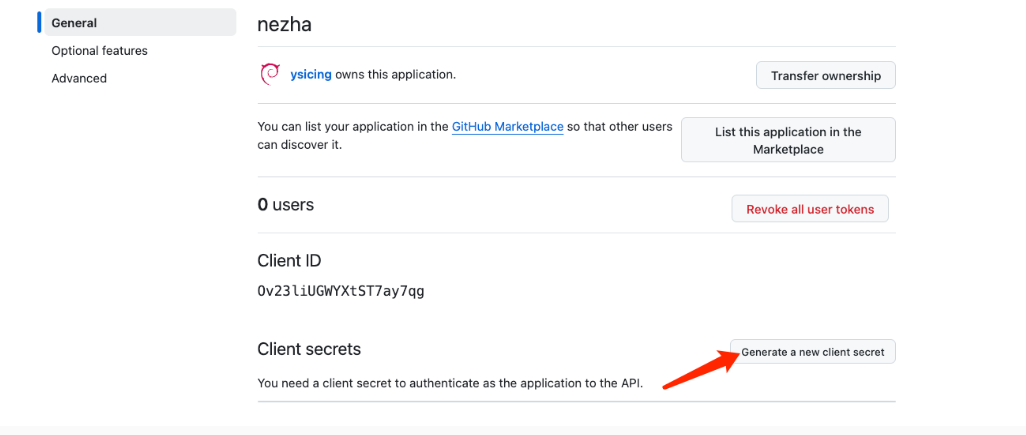
保存页面中的 Client ID,然后点击 “Generate a new client secret“,创建一个新的 Client Secret,新建的密钥仅会显示一次,请妥善保存。
配置文件
Oauth2:
  Admin: ysicing #你的github账号
  ClientID: 19507d56-xxxx # github clientid
  ClientSecret: gto_xxxx # github client secret
  Type: github
部署仪表面板
services:
  nezha-dash:
    container_name: nezha-dash
    image: ccr.ccs.tencentyun.com/k7scn/nezha-dash
    restart: always
    environment:
      - NezhaBaseUrl="哪吒面包URL"
      - NezhaAuth=your-nezha-api-token
    ports:
      - "3000:3000"
利用Cloudflare Tunnel部署哪吒探针
有一种更简单、更安全的方法可以保护您的应用程序和web服务器免受直接攻击:Cloudflare Tunnel。可以借助Cloudflare完全免费的Tunnel服务,快速安全地加密应用程序到任何类型基础设施的流量,让您能够隐藏你的web服务器IP地址,阻止直接攻击。Tunnel后台程序在源web服务器和Cloudflare最近的数据中心之间创建一条加密隧道,同时无需打开任何公共入站端口。使用防火墙锁定所有源服务器端口和协议后,HTTP/S端口上的任何请求都会被丢弃,包括容量耗尽DDoS攻击。数据泄露尝试被完全阻止,例如传输中数据窥探或暴力登录攻击。同时Tunnel支持gRPC的流量转发,用来配置哪吒探针也没有问题。
配置Cloudflare Tunnel
Cloudflare Tunnel支持多种部署方式,并且平台的适配也很完善,具体项目信息可以从Github上查看。下面以Debian为例,简单介绍一下安装方法。
在Cloudflare Dashboard中新建一个隧道,之后你可以获得一串密钥,之后下载合适的deb安装包
curl -L --output cloudflared.deb https://github.com/cloudflare/cloudflared/releases/latest/download/cloudflared-linux-arm64.deb然后可以直接使用一键安装
sudo dpkg -i cloudflared.deb && sudo cloudflared service install eyJhI...注意:这样通过官网service install一键安装的方式需要在/etc/systemd/system/cloudflared.service中增加--protocol http2参数
ExecStart=/usr/bin/cloudflared --no-autoupdate tunnel run --protocol http2 --token eyJhI...更推荐使用Docker安装,部署方式如下:
docker run -d \
    --name cloudflared \
    --restart always \
    --network host \
    cloudflare/cloudflared:latest \
    tunnel --no-autoupdate --edge-ip-version auto run --protocol http2 --token eyJhI...
官方只提供amd64及arm64的docker镜像,其他架构可考虑采用第三方镜像:
docker run -d \
    --name cloudflared \
    --restart always \
    --network host \
    laveao/cloudflared:latest \
tunnel --no-autoupdate --edge-ip-version auto run --protocol http2 --token eyJhI...配置隧道时如果你直接穿透web服务,你可以设置到目标端口,如http://0.0.0.0:12345。反代哪吒面板需要采用Tunnel+Nginx这样的组合,你的服务必须使用https协议,设置Service为https://0.0.0.0:443,同时需要打开No TLS Verify和HTTP2 connection Origin,并配置好Server Name和HTTP Host Header。
部署哪吒探针
哪吒探针的部署官网很详细,你可以轻松的使用Docker部署
docker run -d \
    --name nezha \
    --restart always \
    --network host \
    -v /opt/nezha/dashboard/data:/dashboard/data \
ghcr.io/nezhahq/nezha新版哪吒拉取镜像启动后在设置页面即可配置config.yaml,无需提前写好配置文件。
进阶:如果想要自定义前端主题可以添加前端文件目录的映射,具体如下:
docker run -d \
    --name nezha \
    --restart always \
    --network host \
    -v /opt/nezha/dashboard/data:/dashboard/data \
    -v /opt/nezha/dashboard/user-dist:/dashboard/user-dist \
ghcr.io/nezhahq/nezha映射后需要在GitHub下载主题并解压到/opt/nezha/dashboard/user-dist内并docker restart nezha重启容器,即可应用主题。附上新版哪吒的默认前端Nazhe Dash。
部署Nginx转发
这块比较简单,可以通过监控/proto.NezhaService,区分不同流量,直接贴出我的配置供参考,证书位置,端口等视情况修改。
server {
    listen 443 ssl;
    listen [::]:443 ssl;
    http2 on;
    server_tokens off;
    ssl_certificate    /opt/cert/web.crt;
    ssl_certificate_key    /opt/cert/web.key;
    ssl_session_timeout 1d;
    ssl_session_tickets off;
    ssl_protocols TLSv1.2 TLSv1.3;
    ssl_ciphers HIGH:!aNULL:!MD5;
    ssl_prefer_server_ciphers on;
    server_name status.canghai.org;

    underscores_in_headers on;
    set_real_ip_from 0.0.0.0/0;
    real_ip_header CF-Connecting-IP;

    location ^~ /proto.NezhaService/ {
        grpc_set_header Host $host;
        grpc_set_header nz-realip $http_cf_connecting_ip;
        grpc_read_timeout 600s;
        grpc_send_timeout 600s;
        grpc_socket_keepalive on;
        client_max_body_size 10m;
        grpc_buffer_size 4m;
        grpc_pass grpc://dashboard;
    }

    location ~* ^/api/v1/ws/(server|terminal|file)(.*)$ {
        proxy_set_header Host $host;
        proxy_set_header nz-realip $http_cf_connecting_ip;
        proxy_set_header Origin https://$host;
        proxy_set_header Upgrade $http_upgrade;
        proxy_set_header Connection "upgrade";
        proxy_read_timeout 3600s;
        proxy_send_timeout 3600s;
        proxy_pass http://127.0.0.1:5015;
    }

    location / {
        proxy_set_header Host $host;
        proxy_set_header nz-realip $http_cf_connecting_ip;
        proxy_read_timeout 3600s;
        proxy_send_timeout 3600s;
        proxy_buffer_size 128k;
        proxy_buffers 4 256k;
        proxy_busy_buffers_size 256k;
        proxy_max_temp_file_size 0;
        proxy_pass http://127.0.0.1:5015;
    }
}

upstream dashboard {
    server 127.0.0.1:5015;
    keepalive 512;
}
探针自定义代码
前端自定义
<link rel="stylesheet" href="https://registry.npmmirror.com/lxgw-wenkai-screen-web/latest/files/style.css" />
<style>
  * {
    font-family: LXGW WenKai Screen !important;
  }

  #root > div > main > div.mx-auto.w-full.max-w-5xl.px-0 > div > section > button:nth-child(1) {
    display: none !important;
  }

  #root > div > main > div.mx-auto.w-full.max-w-5xl.px-0 > div > section > button:nth-child(2) {
    display: none !important;
  }

  #root > div > main > div:nth-child(1) > section.mt-10.flex.flex-col.md\:mt-16.header-timer {
    display: none !important;
  }

  #root > div > main > div:nth-child(1) > section.flex.items-center.justify-between.header-top > section.flex.items-center.gap-2.header-handles > div {
    display: none !important;
  }

  #root > div > main > div:nth-child(1) > div > div {
    display: none !important;
  }

  #root > div > main > div.mx-auto.w-full.max-w-5xl.px-0 > section.grid.grid-cols-2.gap-4.lg\:grid-cols-4.server-overview {
    display: none !important;
  }

  #root > div > main > footer > section {
    display: none !important;
  }
</style>
<script>
  window.CustomLogo = "https://status.canghai.org/dashboard/logo.svg";
  window.ForceUseSvgFlag = true;
  window.ForcePeakCutEnabled = true;
  const isMobile = window.matchMedia("(max-width: 768px)").matches;
  window.ForceCardInline = !isMobile;
</script>
后端自定义
<link rel="stylesheet" href="https://registry.npmmirror.com/lxgw-wenkai-screen-web/latest/files/style.css" />
<style>
    html {
        font-family: LXGW WenKai Screen !important;
    }
</style>
<script>
    window.DisableAnimatedMan = true;
</script>
总结
以上就是博主分享的两种安装哪吒探针的方式,各有各的优点。第一种对服务器的性能要求较高,第二种借助了大厂Cloudflare 的优势安装更加的简单。
博主这边就是用的美西的海外高防服务器 VMRack,VMRack 机房在美国洛杉矶 Equinix LA4 金融级数据中心,主打配备全新 AMD EPYC 7K62 高性能处理器,CPU 核心数高达 192 个,vCPU是1:1的资源配比性能稳定,采用分布式块存储和三副本机制,大大提高了磁盘读写能力,轻松应对超高IOPS需求。现目前主要运营三条线路:三网精品(CN2 GIA/9929/CMIN2)、三网优化(163/10099/CMI)以及 美国原生(Global BGP),三条线路基本满足绝大部分人群的日常使用需求以及中小企业日常的办公需求。可以说 VMRack 在线路方面是非常具有竞争优势的。三网精品直连为中国大陆用户提供了低延迟,高速度的优化网络体验,对于日常办公、娱乐、看视频以及海外电商都是非常适用的;三网优化具有非常大的带宽口子,非常满足需要大流量下载的应用场景,比如CND内容分发、影视站点播等;而美国原生则者主打极致性价比和全球连接性,作为美西落地机是非常具有性价比的。

TG交流群: https://t.me/vmrack_chat